主键返回
对于新 insert 的记录,如果想要得到它的主键,有两种方法。一种是设置 useGeneratedKeys,这种方式需要数据库支持自动生成的字段,然后将 keyProperty 设置到目标属性上。另一种是使用子标签 <selectKey> 来实现。
在 mapper.xml 中添加 SQL :
1
2
3
4
5
6
7
8
9
10
11
12
13
14
| <insert id="addUser1" useGeneratedKeys="true" keyProperty="id">
insert into user (username, address, interests) values
(#{u.username}, #{u.address}, #{u.interests});
</insert>
<insert id="addUser2" >
<selectKey keyProperty="u.id" resultType="int" order="AFTER">
SELECT LAST_INSERT_ID()
</selectKey>
insert into user (username, address, interests) values
(#{u.username}, #{u.address}, #{u.interests});
</insert>
|
在 mapper 接口中声明方法:
1
2
| public int addUser1(@Param("u") User user);
public void addUser2(@Param("u") User user);
|
需要注意,方法的返回值是影响的行数并不是主键值,主键值是设置在传入的对象中的,要使用 getId() 方法来获取自增主键值,因此,其实方法声明为 void 也并不影响。其次,因为使用了 @Param 注解,所以在 selectKey 标签中 keyProperty的值不能直接设置为 id, 否则无法获取到主键值。另外实体类中,主键也需要有 setter 方法,否则不能设置。
逆向工程
逆向⼯程实际上就是想⾃动⽣成基础的 mapper.xml 和 mapper 接口,并且内置了一些基础的增删改查操作,不⽤⾃⼰写对应的映射⽂件和接⼝。
先在数据库中添加学生表,分数表,班级表与课程表:
1
2
3
4
5
6
7
8
9
10
11
12
13
14
15
16
17
18
19
20
21
22
23
24
25
26
27
28
29
30
31
32
33
34
35
36
37
38
39
40
| create table card
(
card_id int auto_increment
primary key,
card_num varchar(30) null
);
create table class
(
class_id int auto_increment
primary key,
class_name varchar(10) null
);
create table course
(
course_id int auto_increment
primary key,
course_name varchar(20) null
);
create table course_student_middle
(
course_id int not null,
student_id int not null,
primary key (course_id, student_id)
);
create table student
(
student_id int auto_increment
primary key,
name varchar(10) null,
card_id int null,
class_id int null,
constraint card_fk
foreign key (card_id) references card (card_id),
constraint class_fk
foreign key (student_id) references class (class_id)
);
|
其中 student 与 card 是一对一映射,class 与 student 是一对多映射, course 与 student 是多对多映射。并向其中随意添加一些数据做测试。
在 idea 中下载插件 Better-Mybatis-Generator,之后 idea 连接数据库,右键表即可生成。
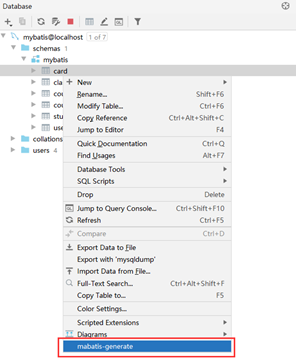
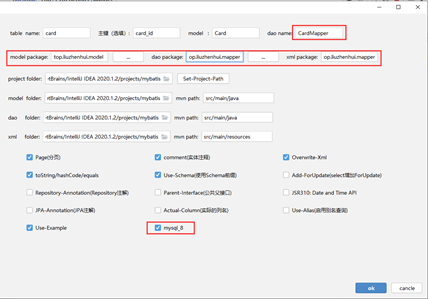
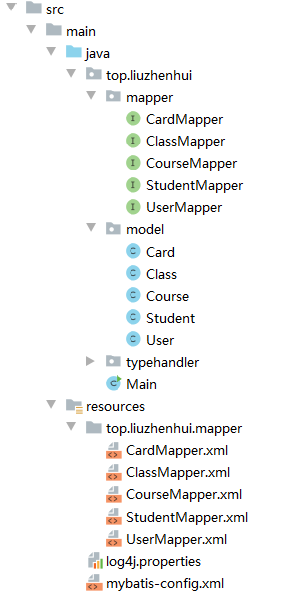
可以看到,通过逆向工程插件,根据数据中的表自动生成了一系列需要的文件,十分方便。
一对一映射
上述逆向工程创建的实体类需要进行简单修改实现一对一映射:
1
2
3
4
5
6
7
8
| public class Student implements Serializable {
private Integer studentId;
private String name;
private Card card;
|
修改 StudentMapper.xml 中的 resultMap 定义查询结果映射关系:
1
2
3
4
5
6
7
8
9
10
11
12
13
| <resultMap id="BaseResultMap" type="student">
<id column="student_id" jdbcType="INTEGER" property="studentId" />
<result column="name" jdbcType="VARCHAR" property="name" />
<result column="class_id" jdbcType="INTEGER" property="classId" />
<association property="card" javaType="card">
<id property="cardId" column="card_id"></id>
<result property="cardNum" column="card_num"></result>
</association>
</resultMap>
<select id="getById" resultMap="BaseResultMap">
select * from student s, card c where s.card_id = c.card_id and s.student_id = #{id};
</select>
|
之后运行 getById 方法,结果为 Student{studentId=5, name='test1', card=Card{cardId=1, cardNum='card1'}, classId=1} 可以看出,已经成功实现了一对一映射。
在 resultMap 标签中,子标签 association 用于描述一对一关系,封装返回结果,association 的子标签 id 与 result 的用法与 resultMap 一样,association 需要配置 property 表示实体类中的属性,javaType表示属性的类型。
一对多映射
一个班级可以有多个学生,修改 class 实体类是实现一对多映射:
1
2
3
4
5
6
7
| public class Class implements Serializable {
private Integer classId;
private String className;
private List<Student> students;
|
修改 ClassMapper.xml 中的 resultMap 定义查询结果:
1
2
3
4
5
6
7
8
9
10
11
12
13
14
15
16
| <resultMap id="BaseResultMap" type="top.liuzhenhui.model.Class">
<id column="class_id" jdbcType="INTEGER" property="classId" />
<result column="class_name" jdbcType="VARCHAR" property="className" />
<collection property="students" javaType="java.util.List" ofType="student">
<id column="student_id" property="studentId"></id>
<result column="name" property="name"></result>
<result column="class_id" property="classId" />
<association property="card" javaType="card">
<id property="cardId" column="card_id"></id>
<result property="cardNum" column="card_num"></result>
</association>
</collection>
</resultMap>
<select id="getClassById" resultMap="BaseResultMap">
select * from class c, student s where c.class_id = s.class_id and c.class_id = #{id};
</select>
|
resultMap 标签中的 collection 标签定义结果中的集合,property 定义属性名, javaType 定义属性的类型,ofType 属性定义集合的元素的类型,其中的子标签与 resultMap 子标签的使用一样。
运行 getClassById方法查询结果如下,由结果可知成功实现了一对多映射:

多对多映射
一门课程可以有多个学生,一个学生可以选择多门课程,这是多对多映射关系,修改 Student 类与 Class 类:
1
2
3
4
5
6
7
8
9
10
11
12
13
14
15
16
17
18
| public class Student implements Serializable {
private Integer studentId;
private String name;
private Card card;
private List<Class> classes;
public class Course implements Serializable {
private Integer courseId;
private String courseName;
private List<Student> students;
|
多对多查询类似于双面性的一对多查询,只要分别对两个 mapper.xml 都定义方法与 resultMap 即可。
延迟加载
在进⾏数据查询时, 为了提⾼数据库查询性能,尽量使⽤单表查询,因为单表查询⽐多表关联查询速度要快。延迟加载就是⼀开始先查询单表,当需要关联信息时,再关联查询。
在 mybatis-config.xml 中配置延迟加载生效:
1
2
3
4
5
6
7
| <configuration>
<settings>
<setting name="cacheEnabled" value="true"/>
<setting name="lazyLoadingEnabled" value="true"/>
<setting name="aggressiveLazyLoading" value="false"/>
</settings>
|
然后在 StudentMapper.xml 中使用延迟加载:
1
2
3
4
5
6
7
8
9
10
11
12
| <resultMap id="BaseResultMap" type="student">
<id column="student_id" jdbcType="INTEGER" property="studentId" />
<result column="name" jdbcType="VARCHAR" property="name" />
<result column="class_id" jdbcType="INTEGER" property="classId" />
<association property="card" javaType="card"
select="top.liuzhenhui.mapper.CardMapper.selectByPrimaryKey"
column="card_id" fetchType="lazy">
</association>
</resultMap>
<select id="getById" resultMap="BaseResultMap">
select * from student where student_id = #{id};
</select>
|
配置延迟加载后,association 中的 select 指定需要执行的语句, column 是传递的参数, fetchType = “lazy” 标识使用懒加载。
修改 main 方法测试懒加载:
1
2
3
4
5
6
7
8
9
10
11
12
13
14
15
| public static void main(String[] args) throws IOException {
SqlSessionFactory sqlSessionFactory = new SqlSessionFactoryBuilder()
.build(Resources.getResourceAsStream("mybatis-config.xml"));
try(SqlSession sqlSession = sqlSessionFactory.openSession()){
if(sqlSession.getConnection() != null){
System.out.println("连接成功");
StudentMapper mapper = sqlSession.getMapper(StudentMapper.class);
Student s = mapper.getById(8);
System.out.println("测试延迟加载");
System.out.println(s);
}else
System.out.println("连接失败");
}
}
|
上述代码执行结果如下,可以看到,确实对 card 属性延迟加载了。
