Spring Security 在 Java Web 项目中,一般使用 Servlet 过滤器对请求进行拦截,然后再 Filter 中通过自己的验证逻辑来决定是否放行请求。同样的,在 Spring Security 中,也是基于这个原理,在进入到 DispatcherServlet 之前就对请求进行拦截,然后通过一定的验证,决定是否放行请求到系统。
引入 Spring Security 在项目中添加如下依赖即可引入 Spring Security
1 2 3 4 <dependency > <groupId > org.springframework.boot</groupId > <artifactId > spring-boot-starter-security</artifactId > </dependency >
Spring Security 被引入后,默认就会保护项目中所有的接口,启动项目时会看到如下日志:
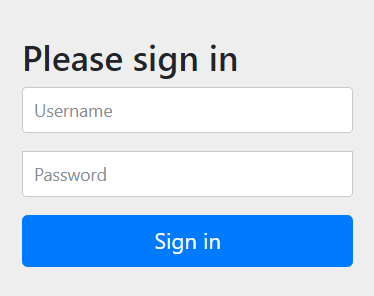
之后在想要访问系统的时候,会弹出如下的界面,默认用户名是 user,密码在启动日志中每次启动随机生成:
你也可以在配置文件中配置自己的用户名和密码:
1
2
spring.security.user.name =user spring.security.user.password =123456
配置 Spring Security Spring Security 提供了 SecurityConfigurer 接口实现对 Spring Security 的配置,对 Web 工程提供了专门的 WebSecurityConfigurer 接口,并且在这个接口的基础上提供了一个抽象类 WebSecurityConfigurerAdapter,只需要继承这个类并覆盖其中的三个 configure 方法即可配置。
1
2
3
4
5
6
7
8
9
10
11
12
13
14
15
16
17
18
19
20
public class SecurityConfig extends WebSecurityConfigurerAdapter @Override protected void configure (AuthenticationManagerBuilder auth) throws Exception super .configure(auth); } @Override public void configure (WebSecurity web) throws Exception super .configure(web); } @Override protected void configure (HttpSecurity http) throws Exception super .configure(http); } }
使用内存签名 内存签名就是将用户信息放在内存中,配置如下:
1
2
3
4
5
6
7
8
9
10
11
12
13
14
15
16
17
18
19
20
21
22
23
24
25
26
27
28
29
30
31
32
33
@Configuration public class SecurityConfig extends WebSecurityConfigurerAdapter @Override protected void configure (AuthenticationManagerBuilder auth) throws Exception PasswordEncoder passwordEncoder = new BCryptPasswordEncoder(); auth.inMemoryAuthentication() .passwordEncoder(passwordEncoder) .withUser("admin" ) .password("$2a$10$0i6jY5Mem3JLlX2CTs9VnebYgHVcsCmm3k9nFTvQ48RKWm7li4tNa" ) .roles("ADMIN" ) .and() .withUser("user" ) .password("$2a$10$0i6jY5Mem3JLlX2CTs9VnebYgHVcsCmm3k9nFTvQ48RKWm7li4tNa" ) .roles("USER" ); } @Override public void configure (WebSecurity web) throws Exception super .configure(web); } @Override protected void configure (HttpSecurity http) throws Exception http.authorizeRequests() .antMatchers("/admin/**" ).hasRole("ADMIN" ) .antMatchers("/user/**" ).hasRole("USER" ) .anyRequest().authenticated() .and() .formLogin() .and() .csrf().disable(); } }
在控制器中添加对应方法:
1
2
3
4
5
6
7
8
9
@GetMapping ("/admin/hello" )public String adminHello () return "ADMIN Hello" ; } @GetMapping ("/user/hello" )public String userHello () return "USER Hello" ; }
然后启动浏览器用不同的用户登录访问不同 url 查看效果即可。
登录的更多配置 1 2 3 4 5 6 7 8 9 10 11 12 13 14 15 16 17 18 19 20 21 22 23 24 25 26 27 28 29 30 31 32 33 34 35 36 37 38 39 40 41 42 43 44 45 46 47 48 49 50 51 52 53 54 55 56 57 58 59 protected void configure (HttpSecurity http) throws Exception http.authorizeRequests() .antMatchers("/admin/**" ).hasRole("ADMIN" ) .antMatchers("/user/**" ).hasRole("USER" ) .anyRequest().authenticated() .and() .formLogin() .loginProcessingUrl("/doLogin" ) .successHandler(new AuthenticationSuccessHandler() { @Override public void onAuthenticationSuccess (HttpServletRequest req, HttpServletResponse resp, Authentication auth) throws IOException, ServletException { resp.setContentType("application/json;charset=utf-8" ); PrintWriter writer = resp.getWriter(); Map<String, Object> map = new HashMap<>(); map.put("msg" , "登录成功" ); map.put("user" , auth.getPrincipal()); writer.write(new ObjectMapper().writeValueAsString(map)); writer.flush(); writer.close(); } }) .failureHandler(new AuthenticationFailureHandler() { @Override public void onAuthenticationFailure (HttpServletRequest req, HttpServletResponse resp, AuthenticationException e) throws IOException, ServletException { resp.setContentType("application/json;charset=utf-8" ); PrintWriter writer = resp.getWriter(); Map<String, Object> map = new HashMap<>(); map.put("msg" , "登录失败" ); writer.write(new ObjectMapper().writeValueAsString(map)); writer.flush(); writer.close(); } }) .permitAll() .and() .logout() .logoutUrl("/logout" ) .logoutSuccessHandler(new LogoutSuccessHandler() { @Override public void onLogoutSuccess (HttpServletRequest req, HttpServletResponse resp, Authentication auth) throws IOException, ServletException { resp.setContentType("application/json;charset=utf-8" ); PrintWriter writer = resp.getWriter(); Map<String, Object> map = new HashMap<>(); map.put("msg" , "注销成功" ); writer.write(new ObjectMapper().writeValueAsString(map)); writer.flush(); writer.close(); } }) .and() .csrf().disable(); }
使用数据库定义用户 大部分情况下用户信息会放在数据库,首先准备好几张表:
1 2 3 4 5 6 7 8 9 10 11 12 13 14 15 16 17 18 19 20 21 22 23 24 25 26 27 create table role ( id int auto_increment primary key , name varchar (20 ) null , nameZh varchar (30 ) null ); create table user ( id int auto_increment primary key , username varchar (30 ) null , password varchar (100 ) null , enabled tinyint (1 ) default 1 null , locked tinyint (1 ) default 0 null ); create table user_role( id int auto_increment primary key , uid int null , rid int null , constraint user_role_role_id_fk foreign key (rid) references role (id ), constraint user_role_user_id_fk foreign key (uid) references user (id ) );
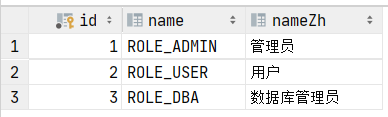
在数据库中加入对应测试数据:
添加 User 类以及 Role 类如下:
1 2 3 4 5 6 7 8 9 10 11 12 13 14 15 16 17 18 19 20 21 22 23 24 25 26 27 28 29 30 31 32 33 34 35 36 37 38 39 40 41 42 43 44 45 46 47 48 49 50 51 52 53 54 55 56 57 58 59 60 61 62 63 64 65 66 67 68 69 70 71 72 73 74 75 76 77 78 79 80 81 82 83 84 85 86 87 88 89 90 91 92 93 public class User implements UserDetails private Integer id; private String username; private String password; private Boolean enabled; private Boolean locked; private List<Role> roles; @Override public boolean isAccountNonExpired () return true ; } @Override public boolean isAccountNonLocked () return !this .locked; } @Override public boolean isCredentialsNonExpired () return true ; } @Override public boolean isEnabled () return this .enabled; } public void setUsername (String username) this .username = username; } @Override public Collection<? extends GrantedAuthority> getAuthorities() { List<SimpleGrantedAuthority> authorities = new ArrayList<>(); for (Role role : roles) { authorities.add(new SimpleGrantedAuthority("ROLE_" + role.getName())); } return authorities; } @Override public String getUsername () return username; } @Override public String getPassword () return password; } public List<Role> getRoles () return roles; } public void setRoles (List<Role> roles) this .roles = roles; } public Integer getId () return id; } public void setId (Integer id) this .id = id; } public void setPassword (String password) this .password = password; } public void setEnabled (Boolean enabled) this .enabled = enabled; } public void setLocked (Boolean locked) this .locked = locked; } @Override public String toString () return "User{" + "id=" + id + ", username='" + username + '\'' + ", password='" + password + '\'' + ", enabled=" + enabled + ", locked=" + locked + '}' ; } }
1 2 3 4 5 public class Role private Integer id; private String name; private String nameZh; }
实现 UserService 如下:
1 2 3 4 5 6 7 8 9 10 11 12 13 14 15 16 17 18 @Service public class UserService implements UserDetailsService @Autowired UserMapper userMapper; @Override public UserDetails loadUserByUsername (String username) throws UsernameNotFoundException User user = userMapper.loadUserByUsername(username); if (user == null ){ throw new UsernameNotFoundException("用户不存在!!" ); } user.setRoles(userMapper.getUserRolesById(user.getId())); return user; } }
实现 UserMapper 接口与 UserMapper.xml 如下:
1 2 3 4 5 6 @Repository public interface UserMapper public List<Role> getUserRolesById (Integer id) public User loadUserByUsername (String username) }
1 2 3 4 5 6 7 8 9 10 11 <?xml version="1.0" encoding="utf-8" ?> <!DOCTYPE mapper PUBLIC "-//mybatis.org//DTD Mapper 3.0//EN" "http://mybatis.org/dtd/mybatis-3-mapper.dtd" > <mapper namespace ="top.liuzhenhui.securitydemo.mapper.UserMapper" > <select id ="loadUserByUsername" resultType ="top.liuzhenhui.securitydemo.model.User" > select * from security.user where username = #{username} </select > <select id ="getUserRolesById" resultType ="top.liuzhenhui.securitydemo.model.Role" > select r.* from role r, user_role ur where ur.uid = #{id} and r.id = ur.rid; </select > </mapper >
在 SecurityConfig 中使用数据库认证:
1 2 3 4 5 6 7 8 9 10 11 12 13 14 15 16 17 18 19 20 21 22 23 24 25 26 27 28 29 30 31 32 33 34 35 36 37 38 39 40 41 42 43 44 45 46 47 48 49 50 51 52 53 54 55 56 57 58 59 60 61 62 63 64 65 66 67 68 69 70 71 72 73 74 75 76 77 78 79 80 81 @Configuration public class SecurityConfig extends WebSecurityConfigurerAdapter @Autowired UserService userService; @Bean PasswordEncoder passwordEncoder () { return new BCryptPasswordEncoder(); } @Override protected void configure (AuthenticationManagerBuilder auth) throws Exception auth.userDetailsService(userService); } @Override public void configure (WebSecurity web) throws Exception super .configure(web); } @Override protected void configure (HttpSecurity http) throws Exception http.authorizeRequests() .antMatchers("/admin/**" ).hasRole("ADMIN" ) .antMatchers("/user/**" ).hasRole("USER" ) .antMatchers("/dba/**" ).hasRole("DBA" ) .anyRequest().authenticated() .and() .formLogin() .loginProcessingUrl("/doLogin" ) .successHandler(new AuthenticationSuccessHandler() { @Override public void onAuthenticationSuccess (HttpServletRequest req, HttpServletResponse resp, Authentication auth) throws IOException, ServletException { resp.setContentType("application/json;charset=utf-8" ); PrintWriter writer = resp.getWriter(); Map<String, Object> map = new HashMap<>(); map.put("msg" , "登录成功" ); map.put("user" , auth.getPrincipal()); writer.write(new ObjectMapper().writeValueAsString(map)); writer.flush(); writer.close(); } }) .failureHandler(new AuthenticationFailureHandler() { @Override public void onAuthenticationFailure (HttpServletRequest req, HttpServletResponse resp, AuthenticationException e) throws IOException, ServletException { resp.setContentType("application/json;charset=utf-8" ); PrintWriter writer = resp.getWriter(); Map<String, Object> map = new HashMap<>(); map.put("msg" , "登录失败" ); map.put("exception" , e.getMessage()); writer.write(new ObjectMapper().writeValueAsString(map)); writer.flush(); writer.close(); } }) .permitAll() .and() .logout() .logoutUrl("/logout" ) .logoutSuccessHandler(new LogoutSuccessHandler() { @Override public void onLogoutSuccess (HttpServletRequest req, HttpServletResponse resp, Authentication auth) throws IOException, ServletException { resp.setContentType("application/json;charset=utf-8" ); PrintWriter writer = resp.getWriter(); Map<String, Object> map = new HashMap<>(); map.put("msg" , "注销成功" ); writer.write(new ObjectMapper().writeValueAsString(map)); writer.flush(); writer.close(); } }) .and() .csrf().disable(); } }
之后在控制器中添加对应测试 url,启动项目测试即可:
1 2 3 4 5 6 7 8 9 10 11 12 13 14 @GetMapping ("/admin/hello" )public String adminHello () return "ADMIN Hello" ; } @GetMapping ("/user/hello" )public String userHello () return "USER Hello" ; } @GetMapping ("/dba/hello" )public String dbaHello () return "DBA Hello" ; }
角色继承 在有的情况下,不同角色之间有继承关系,可以在 SecurityConfig 中添加如下代码加入角色继承关系,之后重启项目测试:
1 2 3 4 5 6 7 @Bean RoleHierarchy roleHierarchy () { RoleHierarchyImpl roleHierarchy = new RoleHierarchyImpl(); String hierarchy = "ROLE_DBA > ROLE_ADMIN \n ROLE_ADMIN > ROLE_USER" ; roleHierarchy.setHierarchy(hierarchy); return roleHierarchy; }
动态权限配置 在之前的代码中,一个角色能登录哪些 url 是写死在代码中的,正常情况下一般要存在数据库中,这样的话方便修改。
在数据库中添加新的表:
1 2 3 4 5 6 7 8 9 10 11 12 13 14 15 16 17 18 create table menu( id int auto_increment primary key , pattern varchar (20 ) null ); create table menu_role( id int auto_increment primary key , mid int null , rid int null , constraint menu_role_menu_id_fk foreign key (mid ) references menu (id ), constraint menu_role_role_id_fk foreign key (rid) references role (id ) );
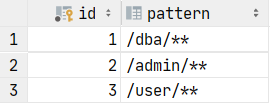
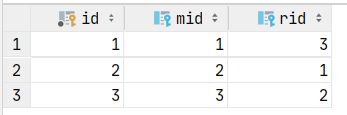
添加对应测试数据:
然后自定义一个实现 FilterInvocationSecurityMetadataSource 接口的类如下:
1 2 3 4 5 6 7 8 9 10 11 12 13 14 15 16 17 18 19 20 21 22 23 24 25 26 27 28 29 30 31 32 33 34 35 36 @Component public class MyFilter implements FilterInvocationSecurityMetadataSource AntPathMatcher antPathMatcher = new AntPathMatcher(); @Autowired MenuService menuService; @Override public Collection<ConfigAttribute> getAttributes (Object o) throws IllegalArgumentException { String requestUrl = ((FilterInvocation) o).getRequestUrl(); List<Menu> menus = menuService.getAllMenus(); for (Menu menu : menus) { if (antPathMatcher.match(menu.getPattern(), requestUrl)) { List<Role> roles = menu.getRoles(); String[] rolesStr = new String[roles.size()]; for (int i = 0 ; i < roles.size(); i++) { rolesStr[i] = roles.get(i).getName(); } return SecurityConfig.createList(rolesStr); } } return SecurityConfig.createList("ROLE_LOGIN" ); } @Override public Collection<ConfigAttribute> getAllConfigAttributes () return null ; } @Override public boolean supports (Class<?> aClass) return true ; } }
自定义一个实现了 AccessDecisionManager 接口的类如下:
1 2 3 4 5 6 7 8 9 10 11 12 13 14 15 16 17 18 19 20 21 22 23 24 25 26 27 28 29 30 31 32 33 34 35 36 @Component public class MyAccessDecisionManager implements AccessDecisionManager @Override public void decide (Authentication authentication, Object o, Collection<ConfigAttribute> collection) throws AccessDeniedException, InsufficientAuthenticationException { for (ConfigAttribute attribute : collection) { if ("ROLE_LOGIN" .equals(attribute.getAttribute())){ if (authentication instanceof AnonymousAuthenticationToken){ throw new AccessDeniedException("用户未登录" ); }else { return ; } } Collection<? extends GrantedAuthority> authorities = authentication.getAuthorities(); for (GrantedAuthority authority : authorities) { if (authority.getAuthority().equals(attribute.getAttribute())){ return ; } } } throw new AccessDeniedException("非法请求" ); } @Override public boolean supports (ConfigAttribute configAttribute) return true ; } @Override public boolean supports (Class<?> aClass) return true ; } }
修改 SecurityConfig 如下:
1 2 3 4 5 6 7 8 9 10 11 12 13 14 15 16 17 18 19 20 21 22 23 24 25 26 27 28 29 30 31 32 33 34 35 36 37 38 39 40 41 42 43 44 45 46 47 48 49 50 51 52 53 54 55 56 57 58 59 60 61 62 63 64 65 66 67 68 69 70 71 72 73 74 75 76 77 78 79 80 81 82 83 84 85 86 87 88 89 @Configuration public class SecurityConfig extends WebSecurityConfigurerAdapter @Autowired UserService userService; @Autowired MyFilter myFilter; @Autowired MyAccessDecisionManager myAccessDecisionManager; @Bean PasswordEncoder passwordEncoder () { return new BCryptPasswordEncoder(); } @Override protected void configure (AuthenticationManagerBuilder auth) throws Exception auth.userDetailsService(userService); } @Override public void configure (WebSecurity web) throws Exception super .configure(web); } @Override protected void configure (HttpSecurity http) throws Exception http.authorizeRequests() .withObjectPostProcessor(new ObjectPostProcessor<FilterSecurityInterceptor>() { @Override public <O extends FilterSecurityInterceptor> O postProcess (O o) { o.setAccessDecisionManager(myAccessDecisionManager); o.setSecurityMetadataSource(myFilter); return o; } }) .and() .formLogin() .loginProcessingUrl("/doLogin" ) .successHandler(new AuthenticationSuccessHandler() { @Override public void onAuthenticationSuccess (HttpServletRequest req, HttpServletResponse resp, Authentication auth) throws IOException, ServletException { resp.setContentType("application/json;charset=utf-8" ); PrintWriter writer = resp.getWriter(); Map<String, Object> map = new HashMap<>(); map.put("msg" , "登录成功" ); map.put("user" , auth.getPrincipal()); writer.write(new ObjectMapper().writeValueAsString(map)); writer.flush(); writer.close(); } }) .failureHandler(new AuthenticationFailureHandler() { @Override public void onAuthenticationFailure (HttpServletRequest req, HttpServletResponse resp, AuthenticationException e) throws IOException, ServletException { resp.setContentType("application/json;charset=utf-8" ); PrintWriter writer = resp.getWriter(); Map<String, Object> map = new HashMap<>(); map.put("msg" , "登录失败" ); map.put("exception" , e.getMessage()); writer.write(new ObjectMapper().writeValueAsString(map)); writer.flush(); writer.close(); } }) .permitAll() .and() .logout() .logoutUrl("/logout" ) .logoutSuccessHandler(new LogoutSuccessHandler() { @Override public void onLogoutSuccess (HttpServletRequest req, HttpServletResponse resp, Authentication auth) throws IOException, ServletException { resp.setContentType("application/json;charset=utf-8" ); PrintWriter writer = resp.getWriter(); Map<String, Object> map = new HashMap<>(); map.put("msg" , "注销成功" ); writer.write(new ObjectMapper().writeValueAsString(map)); writer.flush(); writer.close(); } }) .and() .csrf().disable(); } }
之后启动项目测试不同用户登录能访问的 url 即可。